Bird’s Milk Soufflé Dessert with Raspberry Jelly (Ptichye Moloko, Summer Two-Layer Treat)
There are a few days in July when cherries are already a memory, strawberries have long since turned into jam, and raspberries are at their loudest-soft, velvet, sun-warmed, smelling like the middle of the garden. On days like that, you don’t want heavy cake. You want something airy. Something that makes people pause mid-sentence when the spoon goes in-then quietly reach for a second bite like they’re trying not to be obvious.
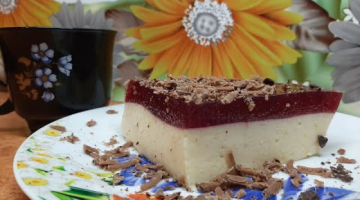
This is that dessert: a classic Bird’s Milk–style soufflé (Ptichye Moloko), topped with a clear raspberry jelly layer that looks like stained glass when the light hits it. The bottom is creamy-vanilla, tender but structured. The top is bright, cool, and intensely berry. Together they feel like “summer dessert” in the most literal sense.
And yes-this looks fancy. No-this does not require a pastry degree. It requires rhythm: temperature awareness, a little patience, and the willingness to stop whipping at the right moment. If you can follow a simple sequence, you can make this. You’ll look like you can’t.
Why Bird’s Milk Still Works (Decades Later)
It’s a texture shapeshifter. It melts on the tongue, but it slices clean. It’s soft, but it holds a neat edge. It’s light, but it doesn’t feel like “nothing.”
It’s not a flour dessert. Many American-style cakes lean hard on flour. This one doesn’t. There’s just a spoonful in the custard base-enough to stabilize and smooth the cream, not enough to turn it into cake.
It keeps well (for a chilled dessert). Properly set gelatin helps the soufflé stay stable for days in the fridge, and the jelly layer acts like a protective cap against drying out.
It welcomes endless variations. Chocolate glaze, citrus, coffee, salted caramel, berry layers-this base is friendly. Today we’re doing raspberry, because raspberry + vanilla + cream is a trio that never loses.
Raspberry Benefits (Quick, Practical Notes)
Raspberries are famously “bright” not only in flavor but in nutrition. They’re a good source of vitamin C, fiber, and plant pigments (anthocyanins) that give them that deep pink-red color. A cup of raspberries can provide a meaningful amount of vitamin C.
Raspberries are also considered a low glycemic choice compared to many fruits, which is why they show up so often in “lighter dessert” ideas. (GI values vary by source and ripeness, but raspberries are consistently described as low-GI.)
One more thing that matters for taste: brief heating doesn’t automatically destroy everything good in fruit. Vitamin C is sensitive, yes-but short, controlled heat treatments can retain a significant portion, especially compared to long simmering. That’s why we warm the raspberry base only as much as needed to dissolve gelatin, not boil it into oblivion.
Ingredients (9×9-inch pan, about 10–12 generous servings)
This recipe is written for a 9×9-inch (or similarly sized) square pan, roughly 24×24 cm.
For the Bird’s Milk Soufflé Layer
-
Unsalted butter (82% preferred) - 200 g (about 7 oz / 14 Tbsp), softened
-
Gelatin (powdered) - 20 g (about 2 Tbsp + 2 tsp, depending on brand)
-
Cold water (for blooming gelatin) - 75 ml (5 Tbsp)
-
Milk - 120 ml (½ cup)
-
Granulated sugar - 300 g (about 1½ cups)
-
Split: ¾ cup for yolks, ¾ cup for whites
-
-
All-purpose flour - 1 heaping Tbsp
-
Large eggs - 4, separated
-
Vanilla sugar - 8–10 g (or use 2 tsp vanilla extract + a little extra sugar)
For the Raspberry Jelly Layer
-
Raspberry syrup - 500 ml (about 2 cups)
-
This can be leftover syrup from jam, or a quick homemade raspberry base (instructions below)
-
-
Gelatin (powdered) - 25 g (about 2½–3 Tbsp depending on brand)
-
Cold water - amount per your gelatin brand instructions (often about ½ cup for this quantity)
If You Don’t Have Raspberry Syrup (Easy Substitute)
Use fresh or frozen raspberries:
-
Raspberries - 400 g (about 3–4 cups)
-
Sugar - 120 g (about ½ cup + 1 Tbsp)
Blend berries, strain out seeds if you want a cleaner jelly, stir in sugar, warm gently to dissolve, then cool to lukewarm before adding gelatin.
Tools That Make This Easier (Not Mandatory, Just Smart)
-
Hand mixer or stand mixer
-
Medium saucepan (heavy-bottom helps)
-
Spatula + whisk
-
Fine-mesh strainer (insurance against lumps)
-
Parchment or acetate strip (nice edges)
-
Instant-read thermometer (optional but extremely helpful for confidence)
Step 1: Bloom the Gelatin (The Quiet Start That Prevents Drama)
Gelatin needs time to absorb liquid before it melts smoothly.
-
In a small bowl, sprinkle 20 g gelatin over 75 ml cold water.
-
Let it sit 10–12 minutes until it swells into a thick gel.
Do not rush this. Unbloomed gelatin is how you get tiny rubbery threads later, and nobody wants to discover that mid-bite.
Step 2: Make the Yolks Custard Base (Smooth, Glossy, No Panic)
This is the part that scares people because it’s “custard.” It’s actually simple if you treat heat like a volume knob, not an on/off switch.
-
In a heavy-bottom saucepan, combine:
-
egg yolks (4)
-
¾ cup sugar
-
1 heaping Tbsp flour
-
Mix gently at first, pressing and rubbing with the whisk/spatula until it looks thick and smooth and most sugar grit is gone. You’re not whipping air; you’re making a paste.
-
Add ½ cup milk in a thin stream, whisking constantly. The mixture will loosen and look too thin. That’s correct.
-
Put the saucepan over low heat. Stir continuously, scraping the bottom and corners. After a few minutes you’ll see the first bubbles and the custard will thicken to a “ribbon” that falls from the whisk.
-
Remove from heat immediately. Cover with plastic wrap touching the surface (this prevents a skin). Cool to room temp.
If you see lumps: strain through a fine sieve while warm, then whisk smooth. Lumps are not a moral failure. They’re a fork in the road, and the sieve is the correct exit.
Step 3: Whip the Egg Whites (Air, Structure, and the Moment to Stop)
Clean bowl. Clean beaters. Even a little fat can ruin the foam.
-
Beat the whites on medium for about 30 seconds until foamy.
-
Increase speed and gradually add:
-
remaining ¾ cup sugar
-
vanilla sugar (or vanilla extract)
-
Continue whipping until stiff peaks form. When you lift the beater, the tip should stand up with a slight bend-like a neat little beak that doesn’t slump.
Common Mistakes Here (So You Don’t Repeat Them)
-
Greasy bowl: wipe the bowl with a little vinegar or lemon juice, then dry.
-
Sugar too fast: dump it all at once and you risk grainy foam. Add gradually.
-
Overwhipping: whites can go dry and clumpy. Stop at stiff peaks, not “crumbly snow.”
Step 4: Turn the Custard into a Butter Cream Base
Now we take the cooled yolk custard and make it silky.
-
Beat softened butter until smooth.
-
Add the cooled custard gradually, mixing until creamy and pale.
You want it silky, not melted. If your kitchen is hot and the butter feels oily, pause and chill the mixture briefly before continuing.
Step 5: Combine Without Crushing the Air
This is where the dessert becomes a soufflé instead of a dense cream block.
-
Set your mixer to low (or switch to a spatula if you’re confident).
-
Add the butter-custard base into the whipped whites one spoonful at a time, mixing gently.
The goal is evenness without deflation. Think of it like folding a blanket: slow, controlled, no aggressive beating.
Step 6: Melt the Bloomed Gelatin and Add It Correctly
Gelatin melts best when treated gently.
-
Warm the bloomed gelatin just until liquid:
-
microwave in short bursts (5–10 seconds), or
-
melt over a warm water bath
-
Do not boil it. Boiling can weaken gelatin’s setting power.
-
Let it cool slightly so it’s warm-not hot.
-
With mixer on lowest speed, drizzle the melted gelatin into the soufflé mixture. Mix only until uniform.
At this stage, your mixture should look like a thick, airy vanilla cloud.
Step 7: Set the Soufflé Layer (First Chill)
-
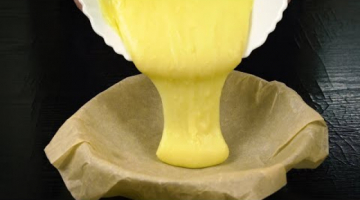
Line a 9×9 pan with parchment or acetate (or lightly oil if needed).
-
Pour in the soufflé. Smooth the top.
-
Refrigerate at least 40–60 minutes until the surface feels springy, not liquid.
This matters. If the base is too soft, the jelly layer will sink and you’ll lose that crisp two-layer look.
Step 8: Make the Raspberry Jelly Layer (Clear, Bright, Not Cloudy)
Bloom the gelatin for the jelly
Bloom 25 g gelatin according to your brand instructions (many call for about ½ cup cold water for this amount).
Warm the raspberry syrup
Warm the raspberry syrup gently to about 104–113°F (40–45°C). You want it warm enough to dissolve gelatin, not boiling.
Add the melted gelatin and stir until fully dissolved.
Cool before pouring
Let the jelly cool to about 86°F (30°C)-cool to the touch but still liquid.
The “no holes” trick (worth doing)
Pour a small amount first, like you’re painting the surface. Let it sit 2–3 minutes until a thin film forms, then pour the rest gently. This reduces trapped bubbles and prevents the top from pitting.
Step 9: Final Chill and Clean Slices
Refrigerate the dessert at least 3 hours, preferably overnight.
For neat slices:
-
Use a long thin knife
-
Warm the blade in hot water, wipe dry
-
Slice in one confident motion (no sawing)
Lift portions with a thin spatula. If you used acetate, it peels away like a professional secret you’re allowed to have.
Flavor Variations (Same Structure, Different Personality)
Tropical Twist
Replace half the raspberry syrup with passion fruit puree.
Result: sharp, exotic acidity, summer vacation energy.
Chocolate-velvet Bird’s Milk
Add 40 g dark cocoa powder to the custard base.
Result: cappuccino color, deeper flavor, less “berry dessert,” more “elegant café.”
Blueberry + Thyme
Swap raspberries for blueberries and add a pinch of thyme (tiny pinch-don’t turn it into soup).
Result: forest vibe, subtle herbal edge.
Lower-sugar Option
You can reduce sugar moderately, but do it carefully-sugar affects foam structure. If you cut too hard, the soufflé can set weaker and weep more quickly.
FAQ (The Questions People Ask Right After It Works Once)
1) Can I use agar-agar instead of gelatin?
You can, but it’s not a direct swap in method. Agar must be boiled to activate and sets differently (more “snap,” less “melt”). Many classic Bird’s Milk versions use agar for stability, especially in commercial-style cakes. If you go this route, use an agar-based recipe specifically rather than swapping blindly.
2) How long does it keep?
Covered in the fridge at about 40°F / 4°C, it’s best within 72 hours. After that, jelly can start releasing moisture, and the soufflé can lose its ideal texture.
3) My jelly layer separated-why?
Most often: the soufflé layer wasn’t set enough before pouring, or the jelly was too warm. Next time, chill the base longer and cool the jelly to lukewarm.
4) Can I skip vanilla sugar?
Yes. Use vanilla extract, lemon zest, or a tiny splash of a citrus liqueur (optional). Just keep liquids minimal so the structure stays strong.
Nutrition (Approx. per 100 g)
These values vary by exact sugar content and your syrup concentration, but a reasonable estimate:
-
Calories: ~238
-
Protein: ~4.7 g
-
Fat: ~12.9 g
-
Carbs: ~25.1 g
(Expect natural variation of about ±5%.)
A Short History of “Bird’s Milk” (And Why It Became Legendary)
The phrase “bird’s milk” existed long before the dessert-an old expression for something rare and luxurious. In Eastern Europe, “Ptasie mleczko” became known as a candy, and later the idea evolved into a cake: an airy soufflé layer with chocolate glaze that became intensely popular. A widely cited modern origin story ties the famous cake version to Moscow’s Praga Restaurant and pastry chef Vladimir Guralnik in the late 1970s, after which it spread rapidly in variations.
What matters for your kitchen today is simpler than any timeline: the concept is powerful because the texture is unforgettable. That’s the whole point.
Serving Ideas (Make It Look Like You Meant To Impress)
Texture contrast: serve with a crisp shortbread cookie or a buttery graham-style crumble underneath.
Color echo: sprinkle freeze-dried raspberry powder on top right before serving for a matte “velvet” look.
Drink pairing: sparkling brut is excellent with berry jelly and vanilla cream. For non-alcoholic: iced mint tea with lemon, not too sweet.
Final Notes (Why You Should Make This Soon)
Because most of the “work” is waiting.
Because the result looks expensive but isn’t.
Because the flavor is clean: creamy vanilla meets cool raspberry, no heaviness, no regret.
Because it travels well to a picnic, a family table, or a “just us at home” evening when you want something that feels like a win.