Vanilla Sponge Cake Roll with Dulce de Leche and Glossy Chocolate Glaze (A 7 Strav Family Favorite)
Sometimes the best dessert isn’t the fanciest one. It’s the one that shows up on an ordinary evening, when the kettle is already humming, when the kitchen smells like something warm and familiar, and when you suddenly realize everyone is circling closer-not because you called them, but because baking has its own gravity.
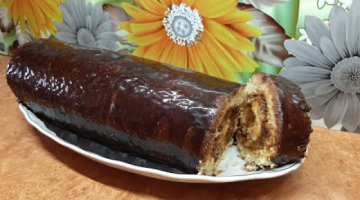
This is that dessert: a soft vanilla sponge cake roll, filled with thick dulce de leche (boiled sweetened condensed milk), and covered in a shiny chocolate glaze that looks like it belongs in a pastry case, yet comes together in your own saucepan in minutes.
You slice it and see the spiral-neat, caramel-colored, confident. The glaze catches the light. The sponge stays tender, slightly moist inside, with a gentle spring that doesn’t crumble or fall apart. And the flavor is exactly what you want with tea or coffee: vanilla warmth, caramel depth, cocoa richness, and that tiny emotional click that says, “Yes. This is the moment.”
This recipe is simple on purpose. No rare ingredients. No special equipment. Just clear steps, a few small “don’t skip this” details, and the kind of technique that makes the result feel like you’ve been baking rolls your whole life.
Why a Sponge Cake Roll Is Worth Keeping in Your Weekly Rotation
A good cake roll is more than a dessert. It’s a strategy.
Speed that feels like magic
A thin sponge bakes fast-usually 10–12 minutes. While it cools, you make the glaze. While the glaze thickens, you spread the filling. The whole process fits into a normal evening without turning into a half-day project.
A base recipe that doesn’t get boring
Once you understand the sponge and the rolling, you can swap flavors endlessly: berries, whipped cream, cream cheese, chocolate ganache, citrus curd, nut spreads. But the classic vanilla + dulce de leche combo? That one never loses.
Budget-friendly, portion-friendly
A handful of pantry staples becomes a dessert you can slice into generous portions. It’s one of those recipes that feels like it should cost more than it does.
It’s built for sharing
A roll slices beautifully. Every piece looks intentional. Even if your glaze isn’t perfectly smooth, the spiral still does the job: it makes people smile before the first bite.
Ingredients (US-Friendly Measurements + Notes That Actually Matter)
This is the ingredient list you’ll keep coming back to. I’ll give you US measurements first, plus approximate grams for those who like precision.
For the vanilla sponge
-
5 large eggs, room temperature
-
1 cup granulated sugar (about 200 g)
-
1 cup all-purpose flour (about 125–130 g)
-
1 teaspoon baking powder
-
1 teaspoon vanilla sugar or 1–2 teaspoons vanilla extract
For the filling
-
About 2/3 cup dulce de leche (roughly 190 g, about half of a standard can/jar)
In the US, look for “dulce de leche” or use boiled sweetened condensed milk if you make it yourself.
For the chocolate glaze (makes a generous amount)
-
1/2 cup milk (about 120 ml)
-
1 cup granulated sugar
-
4 tablespoons unsweetened cocoa powder
-
10–14 tablespoons unsalted butter (about 140–200 g), softened
Note about the glaze: it makes a lot. If you prefer a thinner coating, cut the glaze ingredients in half and keep the same method.
The “Fluffy Test”: Working with Egg Whites Like You Mean It
A sponge roll lives and dies by how you treat the eggs. The goal is a batter full of stable air bubbles. Not random froth-structured foam.
Step 1: Separate cleanly
Separate eggs carefully. Even a small bit of yolk fat can weaken your whites.
Rule: bowl and beaters must be clean and grease-free.
If you’re not sure, wipe the bowl with a little vinegar or lemon juice and dry it.
Step 2: Chill the whites briefly (optional, but helpful)
10 minutes in the fridge can improve foam stability, especially if your kitchen is warm.
Step 3: Start whipping slowly, then build
Whip whites until they look like soft soap bubbles, then increase speed.
Step 4: Add sugar gradually
Add sugar one tablespoon at a time while whipping.
Don’t dump it in-sugar needs time to dissolve and stabilize the foam.
Step 5: Add vanilla at the right time
If using vanilla sugar, add it with the sugar early.
If using vanilla extract, you can add it once the foam is forming-just don’t overdo the liquid.
Step 6: Stop at glossy stiff peaks
You want a thick, glossy foam that holds a peak and doesn’t slump.
Old-school test: tip the bowl carefully. If it stays put, you’re ready.
(Do not get brave and flip it over your head. We are baking, not auditioning.)
Adding Yolks Without Ruining Everything
Once the whites are stable, add yolks one at a time, beating on medium speed for 5–7 seconds per yolk.
This step is underrated. Yolks add richness and color, but too much mixing at this stage can deflate the foam. Quick, controlled, and done.
Flour Phase: The “Gentle Hands” Moment
Mix dry ingredients
Whisk flour and baking powder together. Sift if you can. It really helps.
Fold in batches
Add flour mixture in 3 additions.
Use a spatula and fold gently:
-
scrape the bottom
-
turn the batter over itself
-
rotate the bowl
-
repeat just until no dry streaks remain
Overmixing here is the fastest way to get a flat sponge.
Your goal is batter that flows in a thick ribbon and leaves a faint pattern on the surface for a second before it disappears.
Baking: Time, Temperature, and One Important Pan Detail
Pan size
Use a half-sheet pan (about 13 x 18 inches) or a similar rimmed baking sheet.
If yours is smaller, your sponge will be thicker and may need slightly longer baking.
Prep
Line with parchment paper. Lightly grease the parchment.
Spread evenly
Spread batter into an even layer, about 1/3 inch thick. A small offset spatula helps, but a regular spatula works.
Bake
-
350°F (175–180°C)
-
10–12 minutes
-
No convection if you can avoid it
Check: a toothpick should come out clean.
Also, the sponge should spring back lightly when touched.
Don’t overbake. Slight overbaking is the #1 reason rolls crack.
The Hot Roll Trick: Giving the Cake “Memory”
This step looks simple. It’s not optional.
While hot
As soon as the sponge comes out:
-
Lift it (with parchment) onto a towel.
-
Roll it up while warm, towel included, starting from the short side.
-
Let it cool rolled for 20–25 minutes.
Why this works: while warm, the sponge is flexible. Rolling it now “trains” it into the shape so it won’t fight you later.
This is the difference between a clean spiral and a cracked, stubborn log.
Chocolate Glaze: Shine Without Gelatin, Stress Without Drama
This glaze is bold, glossy, and nostalgic. It sets softly, not like hard candy, and it coats the roll like a chocolate jacket.
Step 1: Combine cocoa + sugar
In a saucepan, whisk cocoa powder and sugar together first.
This prevents cocoa lumps.
Step 2: Add milk
Pour in milk and whisk until smooth.
Step 3: Heat gently
Bring to a gentle simmer. You want bubbles starting to rise lazily-then stop.
Overcooking can make cocoa taste bitter and can make the glaze grainy.
Step 4: Add butter off heat
Remove from heat. Add softened butter and whisk until glossy and smooth.
Step 5: Let it thicken slightly
Give it 8–10 minutes.
It should become thicker-like warm fudge sauce-before you pour.
Filling: Dulce de Leche as Your Sweet Anchor
You don’t need a thick layer. You need the right layer.
Use about 2/3 cup dulce de leche. Spread it evenly, but leave about 1 inch bare at the far edge. When you roll the cake, the filling naturally pushes outward and finishes the job without leaking everywhere.
Spreading tip: warm the dulce de leche slightly if it’s too stiff, but don’t make it runny. A thick, spreadable consistency is ideal.
Assembly: Roll, Trim, Glaze Like You’re Calm (Even if You’re Not)
Unroll carefully
Once the sponge is warm (not hot), unroll it gently.
Spread filling
Even layer, not too thick. Leave the far edge clean.
Roll again
Roll it back up firmly but without squeezing like you’re wringing a towel.
Trim the ends
Slice off a thin piece from each end for a clean spiral.
(And yes, those pieces mysteriously disappear. That’s normal.)
Glaze setup
Place the roll on a wire rack over a plate or baking sheet so extra glaze can drip off.
Two-layer glaze method
-
Pour a thin first layer and let it set for 1 minute.
-
Pour the second layer for that smooth, even finish.
If you want texture, drag a fork lightly across the glaze as it starts to set for a subtle pattern.
Serving and Storage (Because This Roll Actually Survives Real Life)
Clean slices every time
Dip a knife in hot water, wipe dry, slice. Repeat.
Best rest time
Let the roll sit for about 2 hours before serving.
The sponge settles, the filling bonds, the flavor gets deeper.
Refrigeration
Refrigerate if needed for up to 24 hours.
The glaze may lose some shine, but the taste stays solid.
Freezing
Slice into portions, wrap tightly, freeze up to 2 months.
Thaw overnight in the fridge for best texture.
Troubleshooting: What Went Wrong (And How to Fix It Next Time)
“My roll cracked.”
Most common reasons:
-
Overbaked sponge (even 2 extra minutes matters)
-
Rolled too late (cake cooled flat before shaping)
-
Too much flour or overmixed batter
Fix: bake slightly less, roll immediately, fold flour gently.
“My sponge is flat.”
-
Whites weren’t whipped enough
-
Sugar was added too early or too fast
-
Batter was overmixed after flour
Fix: whip to glossy stiff peaks and fold, don’t stir.
“My glaze is grainy.”
-
Boiled too hard or too long
-
Butter added while too hot and separated
Fix: gentle heat, remove early, add butter off heat, whisk patiently.
Flavor Switches: Four Variations That Keep the Recipe Fresh
1) Orange-cinnamon dulce de leche
Mix orange zest and a pinch of cinnamon into the dulce de leche.
It tastes like holiday warmth without becoming “spiced dessert overload.”
2) Poppy seed crunch
Sprinkle 2 tablespoons poppy seeds over the batter before baking.
It adds texture and a subtle nutty note.
3) Sweet-salty pistachio twist
Thin layer of a salty cream (even a lightly sweetened cream cheese works) + chopped pistachios.
Sweet, salty, and surprisingly sophisticated.
4) Coffee-chocolate ganache filling
Melt dark chocolate with hot espresso, cool until spreadable, use instead of dulce de leche.
If you love mocha flavors, this one wins fast.
Small Kitchen Science (For Big Confidence)
A sponge roll rises because whipped egg foam traps air. Heat expands those air bubbles; the egg proteins set and hold the structure. Sugar helps stabilize the foam and keep the sponge tender. Flour provides framework, but too much flour turns your roll from soft and flexible into dry and crack-prone.
Cocoa powder behaves differently depending on processing, which is why some glazes taste sharper and others taste smoother. Gentle heating keeps cocoa from developing harsh bitterness, and butter emulsifies the mixture into something that looks glossy instead of muddy.
And dulce de leche? It’s a slow caramel story: milk sugars and proteins transform into deeper flavor through heating, which is exactly why it tastes like comfort and not just “sweet.”
FAQ: Questions You’ll Ask (And Straight Answers From 7 Strav)
Can I replace dulce de leche with jam?
Yes-choose a thicker jam that doesn’t leak. Tart berry jams work best because they cut sweetness.
Can I use baking soda instead of baking powder?
Not here. Baking soda needs acid to react properly. Baking powder is balanced to rise on its own.
Do I really need to roll it hot?
Yes. That’s the whole secret. If you skip it, you’re gambling.
Can I make it the day before?
Yes. It holds well overnight. Just bring it closer to room temp before serving so the sponge feels soft again.
Final Note: Why This Roll Keeps Winning
This dessert doesn’t shout. It doesn’t need to. It walks in quietly, smells like vanilla, looks glossy in chocolate, and somehow resets the entire mood of the evening.
You make tea. Someone asks for “a small piece” and then immediately asks for another. The spiral shows up perfectly in every slice like it was planned. The glaze leaves a soft chocolate finish on the tongue. The dulce de leche stays thick and caramel-rich, anchoring the sweetness without turning the whole thing into a sugar bomb.
And that’s the reason this vanilla roll has a permanent place in the family recipe lineup: it’s dependable, fast, beautiful in a simple way, and it makes a normal day feel a little kinder.
Bake it once, and you’ll understand why we keep coming back.