Stuffed Baked Mackerel With Cheese and Vegetables (The “Can’t-Stop-Slicing” Family Recipe)
There’s a moment that happens right when the fish comes out of the oven. The kitchen quiets down, like everyone suddenly remembers how to breathe through their nose. You hear that soft crackle of skin that’s been working toward crisp, and the foil releases a quick, steamy sigh-briny, garlicky, a little creamy, and somehow brighter than you’d expect because of the pickle.
And from that moment, the hardest part begins: not cutting into it too soon.
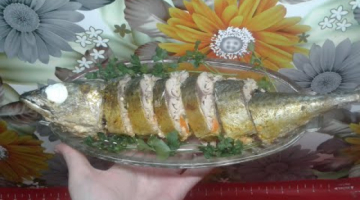
This is stuffed mackerel baked in foil-tender, rich fish filled with a stretchy cheese-garlic mixture and long strips of vegetables. It slices like a festive terrine once it’s chilled, with a mosaic of orange carrot and green pickle inside. It’s simple food that behaves like a special occasion.
If you cook it once and let it rest the right way, you’ll understand why people keep “just one more slice”-ing their way through the whole platter.
Why Mackerel Works So Well Here
Mackerel is one of those fish that doesn’t need you to rescue it. It already has what lean fish sometimes lack: natural richness. That built-in fat is the reason it stays juicy even after a full hour in the oven, and it’s also why it tastes like more than “just fish.”
From a nutrition perspective, raw Atlantic mackerel is commonly listed around 205 calories per 100 grams, with roughly 18–19 grams of protein and about 14 grams of fat.
Health organizations in the U.S. often encourage eating fish regularly-especially oily fish-because of its role in heart-healthy eating patterns. The American Heart Association, for example, recommends two servings of fish per week, with a serving being about 3 oz cooked.
Mackerel also naturally contains vitamin B12 (which supports blood and nerve function). The NIH Office of Dietary Supplements lists the adult recommended intake at 2.4 mcg/day.
So yes-this dish is comforting. But it’s not “junk comfort.” It’s rich food that still feels like it belongs in a sensible week.
Choosing the Right Fish (So You Don’t Ruin It Before You Start)
You can make this with fresh mackerel if you’re lucky enough to have it. In many U.S. areas, though, the most realistic option is frozen-often sold whole.
Here’s what to look for:
Fresh mackerel checklist
-
Eyes: clear, not cloudy.
-
Skin: intact, shiny, with a clean silver pattern.
-
Smell: mild, ocean-salty; anything sharp or “ammonia-ish” is a no.
-
Texture: press the flesh-good fish springs back quickly.
Frozen mackerel checklist
-
Buy fish with a thin, even glaze (a protective layer of ice). Avoid fish buried under a thick, chunky ice shell-heavy ice often means temperature abuse and dried-out fibers later.
-
Check the package for “Atlantic mackerel” if possible. (Different types vary in flavor and, sometimes, in how they’re typically advised to be eaten.)
Ingredients (U.S.-Friendly List)
This makes 2 medium fish (or 1 very large one). You can scale up easily.
Fish
-
2 medium whole mackerel, cleaned (about 1–1¼ lb each), or 1 larger fish
-
1 tsp kosher salt (plus a pinch for the filling)
-
1 tsp fish seasoning (or a mix of paprika + coriander + dried rosemary + lemon zest)
Filling
-
2½ oz (70 g) firm cheese (cheddar, Monterey Jack, low-moisture mozzarella, or a blend)
-
1 processed cheese wedge/brick (about 3 oz / 85–90 g)
(If you can’t find a similar product, see substitutions below.) -
3 garlic cloves, pressed or finely grated
-
2 tsp mayonnaise (optional but recommended for smoothness)
-
Pinch of salt
Vegetables
-
1 medium carrot, boiled until just tender (not mushy)
-
1 dill pickle (or a pickled cucumber), preferably firm
For baking
-
Foil
-
1 tbsp neutral oil (sunflower, canola, avocado)
Tools That Make Life Easier
-
Sharp knife
-
Kitchen scissors (surprisingly helpful for trimming fins)
-
Paper towels
-
Small grater (microplane or fine holes)
-
Tweezers (optional, for pin bones)
-
Baking sheet or, better, a rack set over a sheet pan
Step 1: Prep the Fish (The Calm, “Jeweler” Way)
If you’ve never deboned a whole fish like this, it can look intimidating. But you’re not doing surgery. You’re simply making a “pocket” and removing the spine so the fish can hug the filling.
How to debone for stuffing
-
Remove the head (optional). Some people keep it for presentation, but removing it makes wrapping and chilling easier.
-
Open the belly and remove the innards. Rinse quickly under cold water.
-
Pat dry thoroughly with paper towels. Moisture is the enemy of good texture.
-
Remove the spine:
Cut through the backbone near the neck area, then use a thin knife to work along both sides of the spine down toward the tail, lifting it out as cleanly as possible. -
Pull rib bones and pin bones if you see them.
Now you should have a fish that opens like a book-still connected at the skin, but ready to be filled.
Season and rest
Rub the inside (and a little outside) with:
-
1 tsp kosher salt
-
1 tsp fish seasoning
Then place it in the fridge overnight. This does two things:
-
The seasoning penetrates and actually tastes like it belongs there.
-
The surface dries slightly, so the skin bakes better.
If you absolutely can’t do overnight, don’t panic-there’s a quick version in the FAQ.
Step 2: Make the Cheese-Garlic Filling (Creamy, Stretchy, Not Runny)
The filling here isn’t supposed to be a loose sauce. It should be a thick, spreadable mass that holds shape-like a savory cloud that still knows where it is.
-
Finely grate the firm cheese and the processed cheese.
-
Add garlic, 2 tsp mayo (optional), and a pinch of salt.
-
Mix until it becomes cohesive and lightly sticky.
Let it sit for 10 minutes. Garlic wakes up. Texture settles. You’ll notice it becomes easier to spread.
Step 3: Prep the Vegetables (Long Strips = Pretty Slices)
-
Slice the boiled carrot lengthwise into thin sticks.
-
Slice the pickle lengthwise into thin sticks too.
You’re building a pattern inside the fish. Thin strips mean clean, even slices later.
Step 4: Stuff the Fish (Tight Enough, Not Overstuffed)
This is the rule that saves the dish:
Stuff it so the belly closes easily.
If you have to force it, you used too much. If it closes gently, you win.
How to fill
-
Spread a layer of cheese mixture along the center where the spine used to be.
-
Press lightly so there are no air gaps.
-
Lay carrot and pickle sticks in alternating rows: carrot, pickle, carrot…
-
Add a final thin layer of cheese mixture over the top, like you’re closing the lid on a small box.
If filling tries to escape, remove a little. Don’t argue with physics-heat will expand everything.
Step 5: Wrap Like a “Flavor Envelope”
-
Tear off a large sheet of foil (and a second sheet if the fish is big).
-
Brush foil lightly with 1 tbsp neutral oil.
-
Place fish seam-side up (where the belly closes).
-
Wrap tightly but leave a small air pocket inside-like a mini steam chamber.
Oven temperature (Fahrenheit + Celsius)
-
375°F (190°C) for 60 minutes for medium fish
-
For a large fish:
-
375°F (190°C) for 60 minutes, then
-
300°F (150°C) for 30 minutes
-
Put it on a rack if possible. Air circulation makes everything more even.
Why the two-stage bake for bigger fish?
The first hour firms the proteins and renders some fat-flavor spreads, vegetables soften. The lower temp stage lets the filling settle into a unified slice instead of bubbling violently and breaking the seam.
Step 6: The Secret Step - Cooling (This Is Where the Magic Happens)
Do not unwrap it hot.
Not “try not to.” Don’t.
Let it cool to room temperature still wrapped, then refrigerate still wrapped for several hours, ideally overnight.
This rest does the work you can’t fake:
-
Fat firms slightly, so slices hold together.
-
Juices redistribute instead of spilling out.
-
The filling sets into that clean, layered look.
When chilled, unwrap, grab a truly sharp knife, and slice into portions.
How to Slice It So It Looks Restaurant-Level
-
Slice on a slight diagonal (about 30 degrees).
It shows off the pattern inside. -
Wipe the knife between cuts.
-
Serve on a cool plate if you want the slices to stay neat longer.
Serving Ideas (From Casual to “Guests Are Here”)
Simple, perfect
-
Fresh dill
-
Lemon slices
-
Rye bread or a crusty loaf
That’s it. The dish doesn’t need a parade of sides.
Add a light sauce (very American-friendly)
1) Yogurt Dijon Sauce
-
Plain Greek yogurt
-
Dijon mustard
-
Lime or lemon juice
-
A little zest
2) “Light Tartar”
-
Greek yogurt
-
Finely chopped pickles or capers
-
Green onion
These keep the plate bright and cut through the richness without bullying the fish.
Variations That Don’t Break the Recipe
Swap the vegetables
-
Red bell pepper instead of carrot (sweeter, more colorful)
-
Thin blanched asparagus tips (spring vibe)
-
Green onion + pickle combo (sharper, more deli-like)
Adjust the filling
-
Add ½ tsp turmeric for color and warm depth
-
Add a pinch of smoked paprika for a “BBQ whisper”
-
Mix in chopped dill directly into the cheese
Add a crust finish (optional)
If you want a little more texture, open the foil for the last 8–10 minutes and broil briefly-watching closely. Mackerel goes from “beautiful” to “oops” quickly under broil heat.
Substitutions (So U.S. Grocery Stores Don’t Stop You)
If you can’t find processed cheese the same way
Use one of these:
-
Cream cheese (firmer texture when chilled, very smooth)
-
Ricotta (lighter, but can be looser-reduce mayo)
-
Goat cheese (tangy and great, but more crumbly)
Just remember: processed cheese melts very evenly. Softer cheeses can release more moisture, so keep the filling thick.
If you hate mayonnaise
Use sour cream or Greek yogurt-but add slowly. Too much and the filling gets runny.
Nutrition Notes (Realistic, Not Overpromised)
Atlantic mackerel is widely listed as a nutrient-dense oily fish-protein-rich and naturally higher in fat than lean fish, which is why it stays juicy.
If you’re trying to follow general heart-healthy guidelines, eating fish twice a week is often recommended as part of that pattern.
And if you’re watching vitamin B12 intake (especially if you eat less meat), it helps to know the adult recommended amount is 2.4 mcg/day.
(Exact macros will vary based on fish size and the cheeses you choose.)
FAQ (Because These Questions Always Show Up)
Can I skip the overnight marinade?
You can, but flavor will be lighter and the texture a bit less “together.”
Fast option: season the fish, then let it sit 30–45 minutes in the fridge while you prep the filling. It’s not the same, but it works.
Will it be dry?
Mackerel is naturally forgiving because of its fat content. The bigger risk is over-baking a small fish at the large-fish time. If your fish is under a pound, stick closer to 60 minutes at 375°F.
Do I have to keep the skin?
Yes, if you want the best result. Skin is a natural barrier that keeps moisture in. You don’t need to scale aggressively-just rinse and wipe clean.
My filling leaks. What did I do wrong?
Usually one of these:
-
Overstuffed fish (belly couldn’t close gently)
-
Foil wrap was loose and fish shifted
-
Filling was too wet (too much mayo/yogurt)
Next time: less filling, thicker mixture, tighter wrap.
Can I make it ahead for guests?
This is one of those rare fish dishes that actually gets better after chilling. Make it the day before, slice right before serving, and you’ll look suspiciously talented.
The Story Behind the Dish (Why It Feels Like More Than Dinner)
This is the kind of recipe that travels through families without needing a formal name. Someone’s grandmother made a version with whatever was on hand. Someone else improved the stuffing. And eventually, someone learned the real secret: patience after baking.
What makes it memorable isn’t complexity. It’s the contrast:
-
rich fish + sharp pickle
-
creamy filling + clean vegetable snap
-
hot oven + cold rest
-
quick work + slow reward
And yes-once it’s chilled and you start slicing, it’s hard to stop.
Final Notes (So You Nail It on the First Try)
If you remember only three things, make it these:
-
Dry the fish well before seasoning.
-
Stuff so the belly closes easily.
-
Chill it wrapped before slicing.
Do that, and you’ll get the version that people talk about while they’re still chewing-then quietly take “just one more slice” like they think nobody noticed.